The Powerpoint WOW -
Special effects with images
You can create some great special effects using just powerpoint alone. We can hear them now... "I didn't know you could do that in powerpoint"
Just follow the simple steps to create some cool effects.
1. Cast a fading shadow
Casting a shadow from text adds a neat bit of wow factor
- Insert menu > Picture > From File
- Navigate to the awesome image, click "Insert"
- Size and position your image
- Insert > Picture > WordArt
- Click OK to select the 1st word art style
- Enter your text. CAPITALS and Arial Black work well
- Click OK, then re-size your text using the corner handles
- Format > WordArt > we choose a solid white fill color
- While holding down both the shift and CTRL keys drag the text to just below the original
- Draw menu > Rotate or Flip > Flip Vertical
- Fill Color > Fill Effects > Gradient > One Color (choose Black)
- Slide the transparency "From:" slider to 100%, leave the "To:" on 0%
- Choose the first "Horizontal" variant
- Click OK
2. Text filled with background image but lighter
Text shows the same money image from the background
- Format menu > Background
- Click the drop down triangle and choose "fill effects"
- Click the Picture tab, click "Select Picture"
- Navigate to the awesome graphic, click "Insert" > "OK"
- Insert > Picture > WordArt
- Click OK to select the 1st word art style
- Enter your text. CAPITALS and Arial Black work well
- Click OK, then re-size your text using the corner handles
- Fill color > Fill Effects
- Click the Picture tab, click "Select Picture"
- Navigate to the awesome picture, click "Insert" > "OK"
- From the picture toolbar click the "brightness" setting approx. 3 times
- Format > WordArt
- Fill > Color > Click the drop down triangle and choose "Background"
- Click OK
- For a different effect apply a color wash over just the background with a transparent autoshape
3. Soft edge show through
Full color image fades out to soft edges
- Insert menu > Picture > From File
- Navigate to the awesome graphic, click "Insert"
- Size and position your photo
- Autoshapes > Basic Shapes > Oval
- Draw the shape to totally cover the photo
- Fill Color > Fill Effects > Gradient > One Color (This will be the outer color)
- Slide the transparency "To:" slide to 100%, leave the "From:" on 0%
- Choose "From center" for a circle shape
- Click OK
- Add a white line color to the text for extra legibility
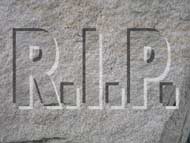
4. Embossed text on an image
|

|
This cool effect works best with just a few letters
- Insert menu > Picture > From File
- Navigate to the awesome picture, click "Insert"
- Size and position your image
- Insert > Picture > WordArt
- Click OK to select the 1st word art style
- Enter your text. CAPITALS and Arial Black work well
- Click OK, then re-size your text using the corner handles
- Fill color > Black
- While holding down both the shift and CTRL keys drag the text down and to the right a small amount
- Fill color > White
- While holding down both the shift and CTRL keys drag the text up and to the left a small amount
- Fill color > Fill Effects
- Click the Picture tab, click "Select Picture"
- Navigate to the same awesome picture, click "Insert" > "OK"
- To recap, you should have 3 pieces of text
- The top left text should be black, the bottom right text should be white
- The text sitting in-between the black and white text is filled with the same graphic as the image that fills the page
- You can increase the amount of embossing by moving the black or white text
- You can also adjust the effect by choosing a "transparency" amount of the white or black text
5. Pictures inside text
Editable text with a picture fill
- Insert > Picture > WordArt
- Click OK to select the 1st word art style
- Enter your text. CAPITALS and Arial Black work well
- Click OK, then re-size your text using the corner handles
- Format > WordArt
- Fill > Color > Click the drop down triangle and choose "Fill Effects"
- Click the Picture tab, click "Select Picture"
- Navigate to the awesome graphic, click "Insert" > "OK"
- Click OK
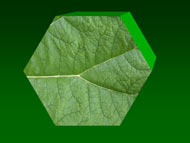
6. 3D graphics
Autoshapes made to look solid with 3D effects
- Draw any autoshape (it works best with regular shapes)
- Fill color > Fill Effects
- Click the Picture tab, click "Select Picture"
- Navigate to the awesome picture, click "Insert" > "OK"
- 3D Style > Pick any preset (Style 14 is a good start)
- From the 3D Settings toolbar experiment with different settings:
- - Try altering from perspective to parallel
- - View different depth settings from 72pt to infinity
- - Change the 3D fill color
7. Rounded corners
Pictures with rounded corners
- Autoshapes > Basic Shapes > Rounded Rectangle
- Draw the shape you require
- Fill color > Fill Effects
- Click the Picture tab, click "Select Picture"
- Navigate to the awesome photo, click "Insert" > "OK"
- Try clicking and moving the yellow circle on the shape to adjust the rounded corner size
- Try adding a semi transparent shadow to give the photo extra lift
8. Solid color to transparent gradient
A full color picture fading to a solid color
- Insert menu > Picture > From File
- Navigate to the awesome picture, click "Insert"
- Size and position your picture
- Draw a rectangle autoshape to cover the picture
- Fill Color > Fill Effects > Gradient > One Color (we chose a nice blue)
- Leave the "From:" on 0%, Slide the transparency "To:" slider to 100%
- Choose the first "Horizontal" variant
- Click OK
- Experiment with different autoshapes and fill directions
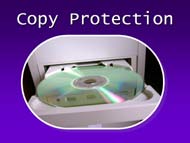
9. 3D plaque over an image
Adding a 3D plaque adds a really professional touch
- Insert menu > Picture > From File
- Navigate to the awesome image, click "Insert"
- Size and position your image
- Autoshapes > Basic Shapes > Rounded Rectangle (it works ok with other shapes too)
- Draw the shape the size you require
- Fill color > Fill Effects
- Choose Gradient > 1 color > Red > to Dark
- Choose the "Diagonal Up" shading style and the "1st variant" direction
- Edit menu > copy > paste > re-size the shape slightly smaller
- Fill color > Fill Effects > choose the 2nd varient direction
- Press F2 to enter text in the same autoshape
We're sure you found these presentation graphics tips really useful. As well as making such great presentation tips we also design and sell powerpoint graphics at
http://www.presentationpictures.com
You can order and download awesome graphics today, or if you prefer why not order the full CD-ROM with hundreds of graphics for powerpoint.
|


 Up to step 11
 Step 12
 Before
 After
After


 Before
 After
After